- double->int
double transVal
(int)Math.round(transVal);
- float->int
Math.round(transVal );
cal.getTime ( ) : 캘린더에 해당하는 Date객체 return
Calendar cal = Calendar.getInstance ( );//오늘 날짜를 기준으루..
cal.add ( cal.MONTH, -2 ); //2개월 전....
System.out.println ( cal.get ( cal.YEAR ) );
System.out.println ( cal.get ( cal.MONTH ) + 1 );
System.out.println ( cal.get ( cal.DATE ) );
Calendar cal = Calendar.getInstance ( );
cal.set ( Integer.parseInt ( args[0] ), Integer.parseInt ( args [1] ) - 1, Integer.parseInt ( args [2] ) );
SimpleDateFormat dFormat = new SimpleDateFormat ( "yyyy-MM-dd" );
System.out.println ( "입력 날짜 " + dFormat.format ( cal.getTime ( ) ) );
System.out.println ( "해당 월의 마지막 일자 : " + cal.getActualMaximum ( Calendar.DATE ) );/**
* @class Xml
* @brief Xml Classes
*
* registered date 20100105
* programmed by Seok Kyun. Choi. 최석균
* http://syaku.tistory.com
*/
package org.syaku.util;
import java.util.*;
import org.jdom.*;
import org.jdom.input.*;
import org.jdom.output.*;
public class Xml {
// 해쉬맵을 이용하여 문서 생성
public Document make(HashMap hm) throws Exception {
Element data = new Element("data");
Element element = new Element("item");
Set set = hm.keySet();
Object []items = set.toArray();
for(int i = 0; i < items.length; i++) {
String name = (String) items[i];
String value = (String) hm.get(name);
addElement(element,name,value);
}
data.addContent(element);
Document document = new Document(data);
return document;
}
// 엘리먼트 생성
public Element addElement(Element parent, String name, String value) {
Element element = new Element(name);
element.setText(value);
parent.addContent(element);
return parent;
}
// 애트리뷰트 생성
public void addAttribute(Element element, String name, String value){
Attribute attribute = new Attribute(name,value);
element.setAttribute(attribute);
}
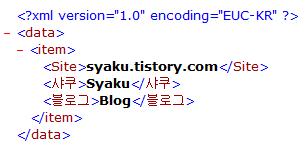
}- XML출력
<%@ page contentType="text/html; charset=euc-kr"%>
<%@ page import="java.util.*" %>
<%@ page import="org.syaku.util.*" %>
<%@ page import="org.jdom.*" %>
<%@ page import="org.jdom.output.*" %>

<%
HashMap hm = new HashMap();
hm.put("샤쿠","Syaku");
hm.put("Site","syaku.tistory.com");
hm.put("블로그","Blog");

Xml xml = new Xml();
Document document = (Document) xml.make(hm);

XMLOutputter outputter = new XMLOutputter();
Format format = Format.getPrettyFormat();
format.setEncoding("EUC-KR");
outputter.setFormat(format);

response.setContentType("application/xml");
outputter.output(document, response.getWriter());
// 시스템출력
// outputter.output(document, System.out);
%>
- 왼쪽, 오른쪽 사이드바는 분문영역 보다 길어지지 않도록 해야함. 길게 되면 아래 footer부분을 가리게 됨. 만약에 길어지게 되면 footer에 margin-top을 설정하는 방법으로 해결하면 됨. 아니면 http://www.shauninman.com/archive/2006/05/22/clearance_position_inline_absolute.php 참고